Thursday, April 2, 2015

Inspect Html elements and console for your Android Hybrid Apps

Now Inspect Html elements and track console as well for your Android Hybrid App as you do for your HTML pages in browser.
You just need chrome browser and some changes in Application’s native code
 Include
import android.annotation.SuppressLint;
On application start class
Also use @SuppressLint("NewApi") before class access definition
Use below code inside on create method
if (android.os.Build.VERSION.SDK_INT >= android.os.Build.VERSION_CODES.KITKAT) {
    android.webkit.WebView.setWebContentsDebuggingEnabled(true);
}
Full Code

package com.achievers.app;

import android.annotation.SuppressLint;
import android.app.Application;

import com.salesforce.androidsdk.smartstore.app.SalesforceSDKManagerWithSmartStore;
import com.salesforce.androidsdk.ui.LoginActivity;

/**
 * Included @SuppressLint("NewApi") for enabling webview showing on inspect element with chrome
 * @author Kunal Bindal
 * Date: 24-03-2015
 */
@SuppressLint("NewApi") public class MyApp extends Application {

       @Override
        public void onCreate() {
         super.onCreate();
         /**
          * For webview showing on inspect element with chrome
          * @author Kunal Bindal
          * Date: 24-03-2015
          * */
         if (android.os.Build.VERSION.SDK_INT >= android.os.Build.VERSION_CODES.KITKAT) {
          android.webkit.WebView.setWebContentsDebuggingEnabled(true);
       }

         SalesforceSDKManagerWithSmartStore.initHybrid(getApplicationContext(), new KeyImpl(), SplashScreenDemoActivity.class, LoginActivity.class);

        }
}


After that go to Chrome 
then


Capture images in android hybrid mobile apps

Are you unable to capture images from android hybrid mobile app ?

Or cordova take picture not working.

Here is the solution

If you are unable to capture images from some of the devices from your android application.

Like capture image for nexus tab which uses Android version greater than 4.4.0
Check out following permissions:

<uses-permission android:name="android.permission.WRITE_EXTERNAL_STORAGE" />


Also some user features:


We need to give write file permissions as well. Which we didn't have to give in previous versions as before it stores captured images in buffer but in some devices it first need to store images in File System then from there it picks.


Monday, March 2, 2015

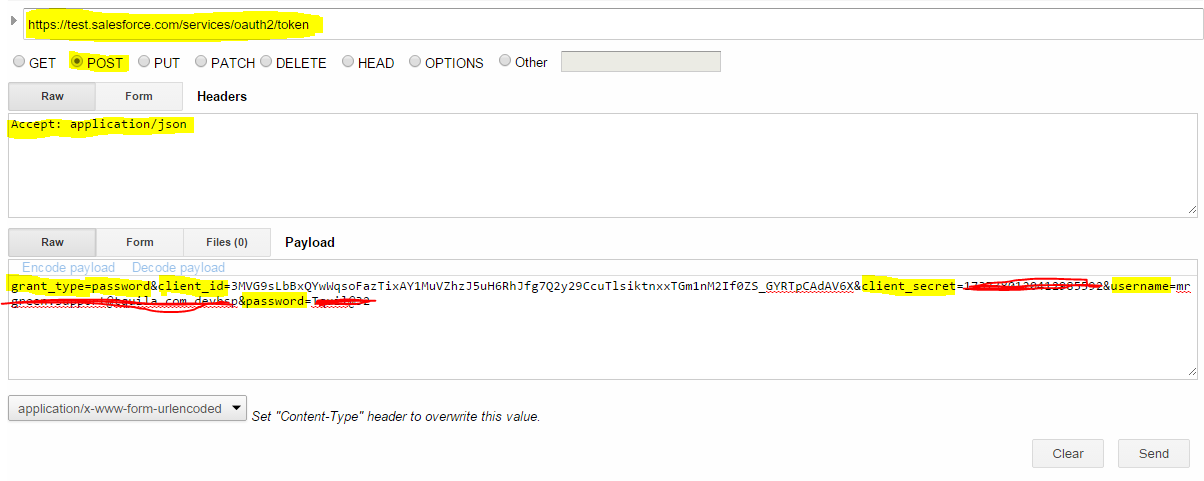
Salesforce Calling web service after authentication

Request to Salesforce
The external App will need to make an HTTP Request with the following values:
• HTTP method: ‘POST’
• Endpoint URL: [Salesforce login domain] + ‘/services/oauth2/token’
• Body:
o username: [Salesfore user’s username]
o password: [Salesfore user’s password]
o client_id: [Salesforce Connected App’s Consumer Key]
o client_secret: [Salesforce Connected App’s Consumer Secret]
o grant_type : ‘password’

The Salesforce login domain will be either:
• https://login.salesforce.com - if interacting with the Production org
• https://test.salesforce.com - if interacting with a Sandbox org
Connected App for the Customer Sync


Sending Request for authentication
1.       Enter following
a.       URL Field :- /services/oauth2/token
b.      Body Field :-grant_type=password&client_id=YOUR_CONSUMER_KEY&client_secret=YOUR_CONSUMER_SECRET&username=YOUR_USER_NAME&password=YOUR_PASSWORD_WITH_SECURITY_TOKEN
c.       Click on ‘Headers’ button, enter following in headers field:-
Content-Type: application/x-www-form-urlencoded

Accept: application/json


Response
Using instance url and access token REST API need to be called
In response it will give

Thursday, November 6, 2014

Android Hybrid Mobile App with Salesforce SDK basic setup

SYSTEM REQUIREMENT  


1. Windows Machine
2. Java (Please make sure JAVA_HOME path is set up)
3. Apache Ant
4. Git
5. Eclipse with Android SDK
6. SalesforceMobileSDK-Android

SET UP ANT 


1.Download Apache Ant Zip File From  http://ant.apache.org/bindownload.cgi
2.Extract Zip to any of your System drive.


3.Set up ANT_HOME. 


Go to  Control Panel ->  System ->  Advanced System Setting - > Advanced - > Environmental Variables

To check Ant is properly set up go to command prompt ant type ant –version. If it shows version then
ant has been properly set up.

SET UP GIT  

  • Download git from http://git-scm.com/downloads
  • Install git  

SET UP ANDROID BUNDLE 

  • Download Android ADT bundle from http://developer.android.com/sdk/index.html 
  • Extract the zip file to a Drive in a folder 
  • This bundle will contain Eclipse with ADT plugin, Android SDK.
  • Set up Android SDK. Download Android 2.2. Open  Eclipse go to Window - > Android SDK Manager.  
  • Select Tools, Android 2.2 and all its component Click install packages.


(I have already installed Android 2.2 that is why it is not counting its packages, please don’t be confused)

  • Set up Emulator, in Eclipse go to Window -> Android Virtual Device Manager - > New fill all the details 


SET UP SALESFORCE MOBILE SDK

  • Open Git Bash. Go to a folder where you want Salesforce SDK to be copied.  Type git clone https://github.com/forcedotcom/SalesforceMobileSDK-Android.git press Enter 

  • Salesforce Mobile SDK is now copied to your system. Now go inside the folder type ./intall.sh press Enter. 

  • This is an additional step but I prefer you should do it. Go to same location in command prompt type install.vbs

 Keep clicking “Ok” on all the popups which will pop out.  

  • Open Eclipse now click file import -> General -> Existing project into workspace on browsing the root directory go to salesforce sdk and import. 

It will show some Errors please follow these steps.
  • Right click on SalesforceSDK go to Android Tools - > Fix project properties.
  • Go to project properties -> Android make sure Android 2.2 is checked.
  • Now there will be 4 other errors like 


  • For the first one. Double click the error it will open encryption.java file comment the line no 74 where there is error save it. You will see 2 errors are gone. Now in the same file change Build.VERSION_CODES.HONEYCOMB to Build.VERSION_CODES.FROYO saves. 

  • SCREENLAYOUT_SIZE_XLARGE double click it, it will open ForceApp.java file change it to SCREENLAYOUT_SIZE_LARGE save now all error are gone, there will be some warnings ignore it. 

CREATE A HYBRID APP  


HYBRI D LOCAL APP (ALL THE HTML AND JS WILL BE I NSIDE THE APP CONTAI NER)


Open command prompt go to salesforceMobileSDK location  type 


Ant create_hybrid_local -Dapp.name={appName} -Dtarget.dir={targetDir} Dpackage.name= packageName} [-Duse.smartstore=true]

  • appName:-Name of your App
  • targetDir:- App location in your system 
  • packageName:- type some package name for example com.myapp  
  • smartstore:- if you are creating a app having capability of offline storage make it true or else don’t include it . (Advised that you should not go for offline version at start up) for example in commond prompt
C:\AndroidDev1\SalesforceMobileSDK-Android> ant create_hybrid_local -Dapp.name=MyApp -Dtarget.dir=C:\MyMobileApps\FirstApp -Dpackage.name=com.myapp 


  • Now in Eclipse File->Import->General->Existing project into workspace now in root directory go to target directory of your project, import the project (From above example it is “FirstApp”). 
  • Now Right click your project, go to properties -> Android check android 2.2 and add SalesforceSDK as library.

  • After that in your project go to bootconfig.js file which will be in folder assets/www of your project.
  • Set consumer key and redirect URL according to your remote access or connected app.  


  • Now the app set up is done. Start your app coding from index.html page in the same folder.  
  • To run the App Right click on it Run As -> Android Application. Enjoy !!!!!!

HYBRI D REMOTE APP (ALL HTML AND JS WI LL BE ON SALESFORCE) 


Open command prompt go to salesforceMobileSDK location  type 
Ant create_hybrid_vf - Dapp.name={appName} -Dtarget.dir={targetDir} Dpackage.name={packageName} -Dapex.page={apexPage} [-Duse.smartstore=true]

  • appName:- Name of your App
  • targetDir:- App location in your system
  • packageName:- type some package name for example com.myapp 
  • apexPage:- Specify which VF should be opened at the start of the app.
  • smartstore:- if you are creating a app having capability of offline storage make it true or else don’t include it . (Advised that you should not go for offline version at start up)

for example in commond prompt  
C:\AndroidDev1\SalesforceMobileSDK-Android> ant create_hybrid_vf  -Dapp.name=MyApp -Dtarget.dir=C:\MyMobileApps\FirstApp -Dapex.page=/apex/VFpage -Dpackage.name=com.myapp  

  • Same as step 2 of previous one.
  • Same as step 3 of previous one.
  • Same as step 4 of previous one
  • Now the Setup is done. You can start coding your VF page and the related page in your SF org.
  • To run the App Right click on it Run As -> Android Application. Enjoy !!!